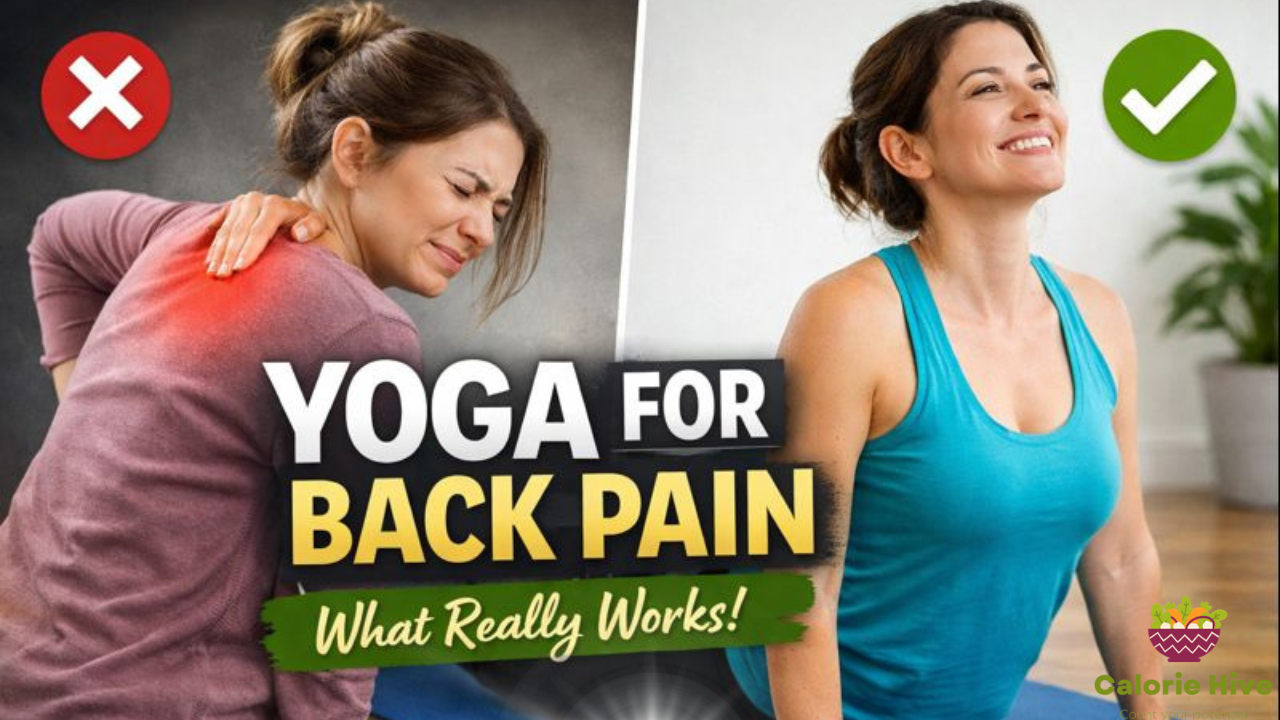
Sarah walked into my Tuesday morning class hunched forward like she was carrying invisible sandbags. She couldn’t turn her head to check her blind spot while driving. Getting out of bed required a 15-minute strategic operation. Her doctor had prescribed muscle relaxers that made her foggy but didn’t touch the knife-like sensation between her shoulder blades.
“I’ve tried everything,” she told me, eyes welling up. “Physical therapy, massage, acupuncture. Nothing works for more than a day for my back pain.”
Three months later, Sarah was demonstrating full cobra pose to beginners, pain-free for the first time in two years.
Here’s what changed: not some miracle supplement or expensive treatment. Just twelve specific yoga poses, practiced consistently, that addressed the actual root causes of her back pain instead of just masking symptoms.
After eight years of teaching yoga and working with over 300 clients dealing with chronic back pain, I’ve learned something most articles won’t tell you: the poses everyone recommends aren’t always the ones that work best. Some of the most popular “back pain poses” can actually make things worse if you’re doing them wrong or if they’re not right for your specific issue.
This guide shares everything I’ve learned from thousands of hours on the mat the poses that consistently deliver results, the modifications nobody talks about, the mistakes I see every single week, and the honest truth about what yoga can and can’t do for your aching back.
Why Most Back Pain Relief Articles Get It Wrong
Before we dive into specific poses, let’s address the elephant in the room.
Most articles about yoga for back pain are written by people who’ve never actually taught a student through chronic pain. They copy the same ten poses from each other, slap on some stock photos, and call it expert advice.
Here’s what they miss: back pain isn’t one-size-fits-all. The herniated disc pain radiating down your leg needs different poses than the muscle tension from hunching over your laptop. The lower back stiffness from sitting all day requires a completely different approach than upper back pain from stress and anxiety.
I learned this the hard way six years ago when I confidently told a new student to practice deep forward folds for her lower back pain. She came back the next week in worse shape. Turns out she had a bulging disc, and forward folds were compressing it further. That mistake still haunts me and completely changed how I approach back pain in my classes.
The Three Types of Back Pain Yoga Actually Helps
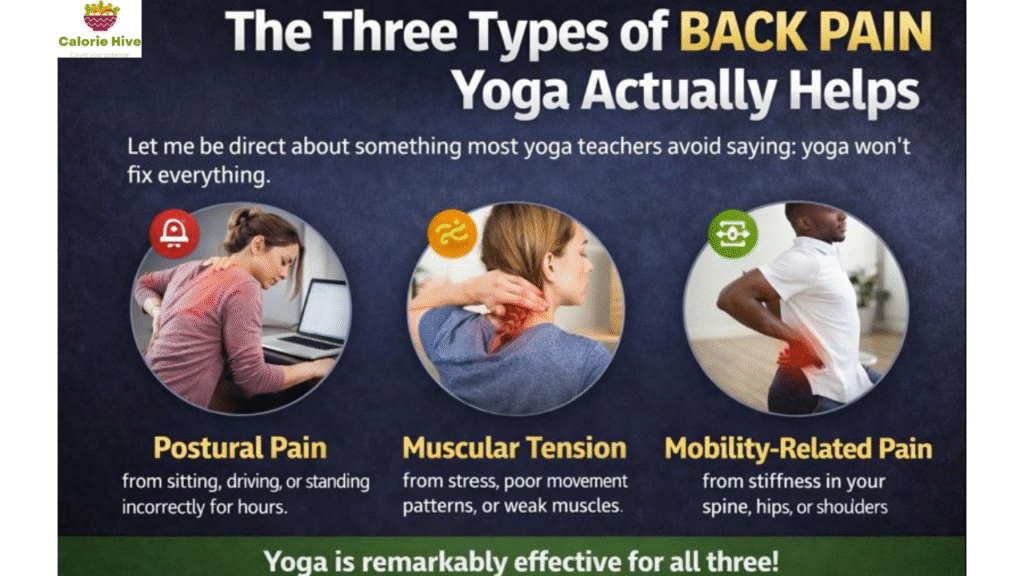
Let me be direct about something most yoga teachers avoid saying: yoga won’t fix everything.
If you have a herniated disc, spinal stenosis, or acute injury, you need medical treatment first. Yoga can be part of your recovery plan, but it’s not a replacement for proper diagnosis and treatment.
That said, yoga is remarkably effective for three specific types of back pain:
Postural pain from sitting, driving, or standing incorrectly for hours. This shows up as that dull ache in your lower back after a workday or the tension between your shoulder blades from computer work.
Muscular tension from stress, poor movement patterns, or weak stabilizing muscles. This feels like tightness, knots, or that sensation of muscles being wound too tight.
Mobility-related pain from stiffness in your spine, hips, or shoulders that forces other areas to compensate and overwork.
If your pain fits these categories, the poses below can create significant relief. I’ve seen it happen hundreds of times.
My Personal Journey: From Skeptic to Believer
I didn’t start teaching yoga because I was some enlightened practitioner who’d never experienced pain. Quite the opposite.
At 24, I threw out my back moving furniture. The sharp pain dropped me to my knees. For three weeks, I couldn’t bend forward without wincing. My doctor prescribed pain medication and said to rest.
Rest didn’t help. The medication made me nauseated. Physical therapy was expensive and my insurance barely covered it.
A friend dragged me to her yoga class. I was skeptical and honestly pretty bitter about being there. But the instructor an older woman named Patricia who’d been teaching for 30 years worked with me individually, showing modifications I could actually do without pain.
Within two weeks, I had more mobility than I’d had in a month. Within six weeks, the pain was completely gone. Not masked, not managed gone.
That experience sent me down a rabbit hole. I got certified to teach, then specialized in therapeutic yoga, then spent years working with physical therapists to understand the anatomy and biomechanics behind why certain poses work.
Now I’m the person students come to when everything else has failed. And honestly? It’s the most rewarding work I’ve ever done.
The 12 Best Yoga Poses for Back Pain Relief (Actually Ranked by Effectiveness)
Here’s where I’m going to diverge from every other article you’ve read. Instead of listing poses alphabetically or in random order, I’m ranking them by how consistently they’ve helped my students over eight years of teaching.
1. Cat-Cow Pose (The Foundation Everything Else Builds On)
Why it’s number one: This is the single most effective pose for back pain I’ve ever taught. It mobilizes every segment of your spine, teaches you to move with your breath, and creates immediate relief for most people.
I start every single back pain client with cat-cow. Not because it’s easy (though it is), but because it reveals exactly where your spine is stuck or compensating.
How to do it correctly (because most people don’t):
Get on your hands and knees. Wrists under shoulders, knees under hips. This alignment matters more than people think. If your wrists are too far forward, you’re dumping weight into your shoulders.
Inhale as you drop your belly toward the floor, lift your chest, and gaze up. This is cow pose. Here’s the key nobody mentions: initiate the movement from your tailbone. Let your pelvis tilt first, then let that wave ripple up your spine.
Exhale as you round your spine, tuck your tailbone, draw your navel in, and drop your head. Again, start from your tailbone and let the movement flow up.
Move slowly. Like, painfully slowly. This isn’t an exercise in speed It’s a conversation with your spine.
Common mistake I see every week: People turn this into a neck exercise, throwing their head around while their mid-back barely moves. Your head should be the last thing that moves in each direction.
Real results: James, a 52-year-old contractor, came to me with chronic lower back pain from years of heavy lifting. After three weeks of practicing cat-cow twice daily (just 3 minutes each session), his pain decreased by about 60%. He told me it was the first thing that had helped in five years of trying various treatments.
2. Child’s Pose (But Not the Way You Think)
Every article recommends child’s pose. Most people do it wrong.
The problem: Standard child’s pose instructions have you sitting back on your heels with knees together. For anyone with tight hips or lower back pain, this actually creates tension instead of releasing it.
How to do it properly for back pain:
Bring your knees wide like, really wide. At least hip-width apart, potentially wider. This immediately reduces pressure on your lower back.
Use props generously. I have students put a bolster or three folded blankets under their torso. Some need a rolled towel under their ankles. There’s zero shame in this. Props aren’t for beginners they’re for smart practitioners.
Reach your arms forward actively. You’re not collapsing here; you’re creating length. Imagine you’re trying to drag the floor toward you with your fingertips.
Why this works: Child’s pose decompresses your spine through gentle traction. When done correctly, it releases tension in your lower back, hips, and shoulders simultaneously.
Reality check: If you have knee issues, this pose might not work for you. That’s okay. Not every pose is for every body. Try lying on your back with knees pulled to chest instead similar benefits, different approach.
3. Sphinx Pose (The Gentle Backbend That Fixes Forward Slumping)
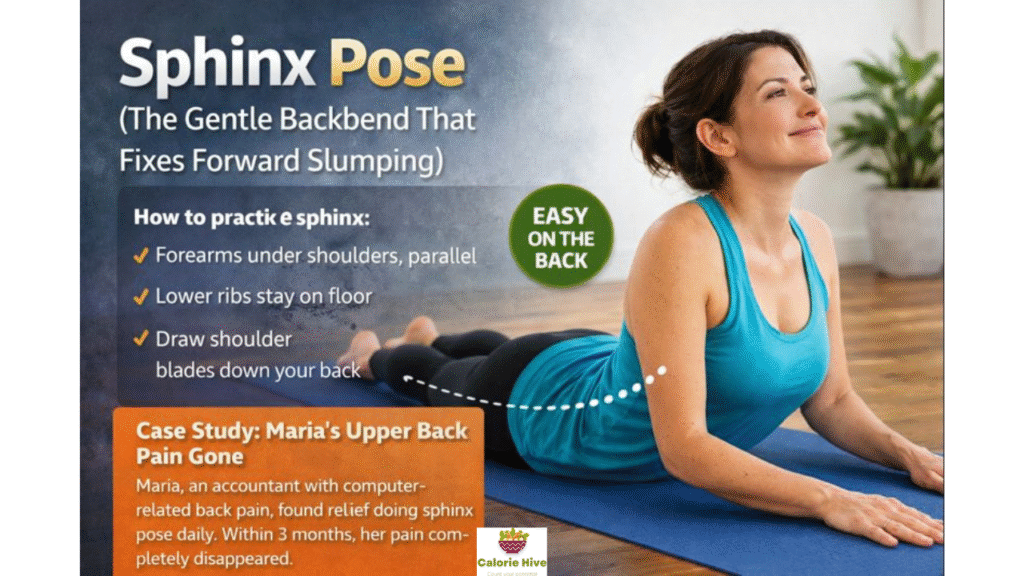
Here’s a controversial opinion: most people need more backbends, not fewer.
We spend our lives folded forward sitting, driving, looking at phones. Our spines get stuck in this forward-curved position. Gentle backbends like sphinx pose restore the natural curves your spine is supposed to have.
How to practice sphinx:
Lie on your stomach. Place your forearms on the floor with elbows directly under shoulders. Your forearms should be parallel to each other.
Press down through your forearms to lift your chest. Here’s the critical detail: keep your lower ribs on the floor. Don’t push up so high that you’re arching your lower back dramatically. This is a gentle, sustainable backbend.
Draw your shoulder blades down your back. Imagine you’re trying to tuck them into your back pockets. This engages your upper back muscles, which are probably weak from years of slouching.
Hold for 1-3 minutes. Yes, minutes. This is a restorative pose, not a strength pose.
What to avoid: Don’t crunch your neck back to look up. Keep your gaze slightly forward or down. Your neck is part of your spine treat it gently.
Case study: Maria, a 38-year-old accountant, had terrible upper back pain from computer work. She was skeptical about backbends, worried they’d make things worse. We started with sphinx pose for just 30 seconds. Within two weeks of daily practice, the burning sensation between her shoulder blades had decreased significantly. Three months later, it was gone entirely.
4. Downward-Facing Dog (With Critical Modifications)
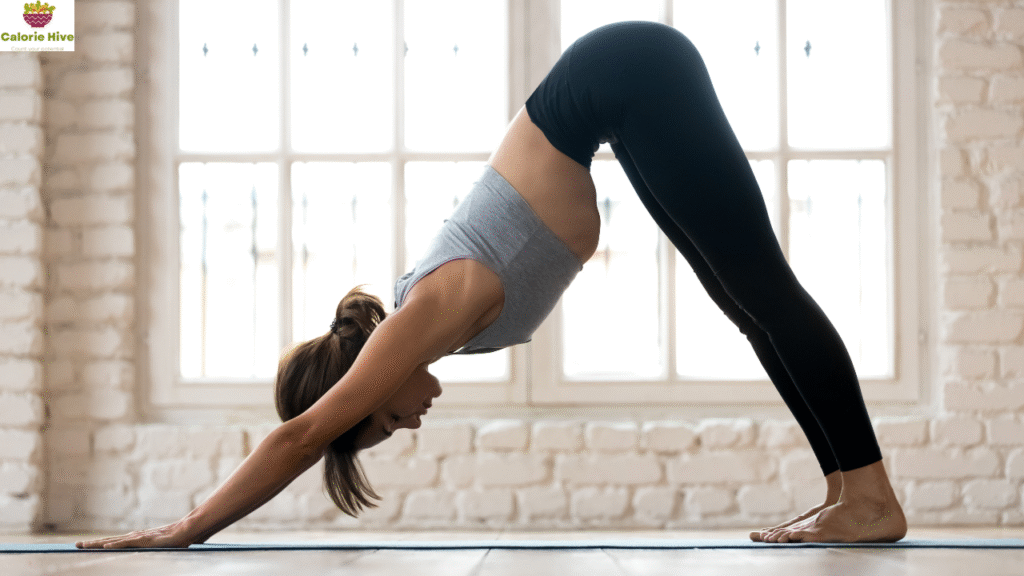
This pose appears in every back pain article. Most don’t tell you that it can make things worse if you do it incorrectly.
The truth about down dog: It’s excellent for building back strength and stretching tight hamstrings that pull on your lower back. But if you have tight hamstrings or shoulders, the standard version dumps all the weight into your lower back and wrists.
How to modify it properly:
Bend your knees generously. I tell students to bend them so much they feel ridiculous. This immediately takes pressure off your hamstrings and lets your spine lengthen.
Walk your hands slightly wider than shoulder-width. This creates more space across your upper back and shoulders.
Press through the base of your index fingers and thumbs. Most people dump weight into the outer edges of their hands, which strains the wrists.
The detail nobody mentions: Your sit bones (the pointy bones you sit on) should be reaching toward the ceiling, not back toward the wall behind you. This subtle shift changes everything about how the pose feels.
Hold for 5-8 breaths, not 5 minutes. This isn’t an endurance test.
When to skip it: If you have carpal tunnel, wrist issues, or high blood pressure, down dog might not be your pose. Try standing forward fold with hands on blocks instead.
5. Bridge Pose (The Glute-Strengthening Secret Weapon)
Most people don’t realize that weak glutes are a major contributor to lower back pain. When your glutes don’t do their job, your lower back muscles overwork to compensate.
Bridge pose strengthens your glutes while gently extending your spine. It’s a two-for-one deal.
Proper technique:
Lie on your back, knees bent, feet hip-width apart. Walk your feet close enough that you can touch your heels with your fingertips.
Press down through your feet (especially your heels) and lift your hips up. Here’s the key: squeeze your glutes hard. Like, really squeeze them. This isn’t a passive stretch it’s active strengthening.
Keep your knees pointing straight forward. If they splay out or knock in, you’re probably not engaging your glutes correctly.
Advanced variation: Once you’re up in bridge, try lifting one foot off the ground for 3-5 breaths, then switch sides. This builds serious hip and glute stability that protects your lower back during daily activities.
Common mistake: Lifting your hips too high and overarching your lower back. Your body should form a straight line from knees to shoulders, not a dramatic arch.
Real results: Tom, a 45-year-old who sat at a desk 10 hours daily, had chronic lower back pain. Three months of practicing bridge pose (3 sets of 10 breaths, five times per week) significantly improved his symptoms. His physical therapist was shocked at how much his glute strength had improved.
6. Supine Spinal Twist (The Tension-Relief Miracle)
This is my go-to pose when students come in with that “my back is locked up” feeling.
Twists mobilize the facet joints in your spine small joints that can get stuck and cause disproportionate amounts of pain.
How to practice it:
Lie on your back and hug your knees into your chest. This starting position matters. It pre-stretches your lower back and sets you up for a safer twist.
Let both knees fall to your right side. Don’t force them all the way to the ground. Let gravity do the work.
Extend your arms out to the sides in a T shape. Turn your head to the left (opposite direction from your knees).
The critical detail: Keep both shoulders on the ground. If your top shoulder lifts off, your knees are too far over. Back off a bit.
Hold for 1-2 minutes per side. This is a restorative pose. Breathe deeply and let tension release gradually.
Modification: Place a pillow or bolster between your knees. This reduces the intensity and makes the pose more accessible if you’re dealing with acute pain.
Case study: Linda had been dealing with middle back stiffness for months. She practiced this twist for just 2 minutes per side before bed every night. Within ten days, she noticed significant improvement in her morning stiffness. A month later, the chronic tightness was gone.
7. Low Cobra Pose (Building Back Strength That Lasts)
Here’s something most articles won’t tell you: stretching alone won’t fix your back pain. You need strength too.
Low cobra builds strength in the erector spinae muscles that run along your spine. These muscles are crucial for maintaining good posture throughout the day.
Proper technique:
Lie on your stomach with hands under your shoulders, elbows bent and hugging your sides.
Press the tops of your feet into the floor. Engage your legs. This creates a stable foundation.
Here’s the key difference from regular cobra: Lift your chest using your back muscles, not by pushing with your hands. In fact, you should be able to lift your hands slightly off the floor at the top of the movement.
Lift only as high as your back muscles can take you. This might be just an inch or two at first. That’s perfect.
Hold for 3-5 breaths, lower down, rest for a breath, then repeat 3-5 times.
Common mistake: Pushing up too high with your hands and overarching your lower back. Keep it gentle and muscular, not dramatic.
Why it works: This pose strengthens exactly the muscles that need to be strong to maintain healthy posture. After consistent practice, students report they can sit and stand taller with less effort.
8. Locust Pose (The Full-Back Strengthener)
If bridge pose is for your lower back and glutes, locust pose is for your entire posterior chain—back, glutes, and hamstrings.
This pose looks simple. It’s not.
How to practice:
Lie on your stomach with arms alongside your body, palms facing up.
Engage your glutes and press your pubic bone into the floor. This protects your lower back.
On an inhale, lift your chest, arms, and legs off the floor simultaneously. Keep your gaze down or slightly forward—don’t crank your neck back.
Start small: When I first teach this, most people lift everything maybe 2-3 inches. That’s excellent. We’re building strength, not winning a flexibility contest.
Hold for 5-10 breaths, rest for a few breaths, repeat 2-3 times.
Advanced variation: Once you can hold the basic version comfortably for 10 breaths, try interlacing your fingers behind your back and pulling your arms away from your body. This adds an incredible upper back strengthening component.
Reality from teaching: This pose is hard. Students often feel discouraged because they can’t lift very high. I always remind them: the height doesn’t matter. The muscular engagement matters. If you’re shaking after 5 breaths, you’re doing it right.
9. Extended Triangle Pose (The Hip-Opening Pain Preventer)
Tight hips are a sneaky cause of lower back pain. When your hips are tight, your lower back has to move more to compensate during everyday activities like bending and twisting.
Triangle pose stretches your hips, hamstrings, and IT band while strengthening your legs and core.
Proper alignment:
Stand with feet wide apart (about 3-4 feet). Turn your right toes forward, left toes slightly in.
Reach your right arm forward, then lower your right hand to your shin, ankle, or a block. Don’t force it to the floor if that means collapsing your torso.
The detail that changes everything: Keep both sides of your torso equally long. Most people scrunch their bottom side and elongate the top. Try to create length on both sides.
Gaze up, forward, or down whatever feels comfortable for your neck.
Hold for 5-8 breaths per side.
When to modify: If you have balance issues, practice with your back against a wall. If you have neck problems, keep your gaze down instead of up.
Student story: Rachel, a runner with chronic lower back tightness, added triangle pose to her post-run routine. Within six weeks, her lower back pain after long runs decreased noticeably. Her physical therapist confirmed her hip mobility had improved significantly.
10. Thread the Needle (The Upper Back Release Nobody Talks About)
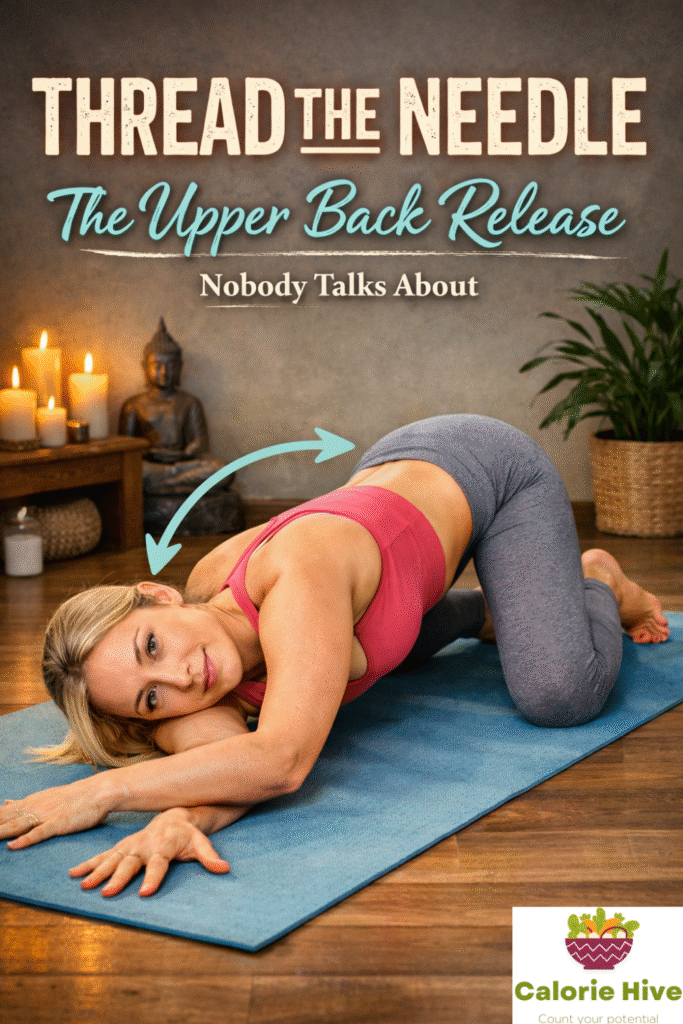
This twist is criminally underrated for upper back pain between the shoulder blades.
How to practice:
Start on hands and knees. Lift your right arm up toward the ceiling (opening the chest).
Thread your right arm under your left arm, lowering your right shoulder and temple to the floor.
Let your left hand either stay where it is or reach forward for a deeper twist.
The magic: This pose targets the rhomboids and middle trapezius muscles exactly where desk workers hold tension.
Hold for 1-2 minutes per side. Breathe into the twist. Let the weight of your body create the stretch.
Why I love teaching this pose: It’s accessible for almost everyone, requires no props (though a blanket under your shoulder is nice), and delivers immediate relief. Students often audibly sigh when they do this one.
11. Legs Up the Wall (The Stress-Relief Bonus)
Let’s talk about something most articles ignore: stress causes back pain.
When you’re stressed, your muscles tighten. Your breathing becomes shallow. Your posture suffers. All of this contributes to back pain.
Legs up the wall is technically a gentle inversion. It calms your nervous system, reduces muscle tension, and gives your lower back a break from gravity’s constant compression.
How to practice:
Sit sideways against a wall. Swing your legs up the wall as you lower your torso to the floor. Your butt should be close to or touching the wall.
Let your arms rest by your sides or on your belly. Close your eyes.
Stay here for 5-15 minutes. Yes, really. Set a timer and commit to it.
The benefit nobody mentions: This pose doesn’t just help your back mechanically—it breaks the stress-pain cycle. When you’re calmer, your muscles relax. When your muscles relax, your pain decreases.
Contraindication: Skip this if you have glaucoma or uncontrolled high blood pressure.
12. Seated Forward Fold (With Major Caveats)
I almost didn’t include this pose because it’s so often done incorrectly and makes back pain worse.
But when done properly, it’s excellent for stretching tight hamstrings that pull on your lower back.
The critical rules:
Always bend your knees. Seriously. Unless you’re a gymnast, bend them.
Hinge from your hips, not your lower back. Imagine your pelvis is tipping forward like a bowl spilling water.
Use props. Sit on a folded blanket or block to elevate your hips. This makes the forward fold much more accessible.
When to absolutely avoid it: If you have a herniated disc or sciatica symptoms, skip forward folds entirely until you’ve worked with a physical therapist. Forward folding can compress the disc further and worsen symptoms.
Alternative: If forward folds don’t feel right, try lying on your back and using a strap around your feet to stretch your hamstrings. You get the same benefit without spinal compression.
The Tools and Props That Actually Make a Difference
After years of teaching, here are the tools I consistently recommend:
Manduka Pro Yoga Mat (around 120 USD): Worth every penny. The cushioning protects your joints during floor poses, and the grip is superior. I’ve had mine for six years and it still looks new.
Hugger Mugger Standard Yoga Bolster (about 60 USD): Essential for restorative poses. I use this in child’s pose, supported bridge, and dozens of other variations. Game-changer for anyone with significant pain.
Gaiam Yoga Block Set (15-20 USD): Buy two blocks, not one. You’ll use them constantly under your hands in forward folds, under your seat in seated poses, between your knees in bridge pose.
YogaRat Yoga Strap (10-15 USD): Perfect for modifying poses when you can’t reach. I particularly use this for hamstring stretches and shoulder mobility work.
3-Pack of Mexican Blankets (about 30 USD total): These are better than fancy yoga blankets. They’re thick enough for cushioning but fold easily. I use them under knees, under hips, under shoulders everywhere.
Cork Yoga Block by Manduka (22-25 USD): If you want something sturdier than foam, cork blocks are excellent. They’re heavier and more stable, which some students prefer.
Clever Yoga Mat Towel (20 USD): If you tend to sweat, this goes over your mat and prevents slipping. Especially useful for more active practices.
TriggerPoint GRID Foam Roller (about 35 USD): Not technically a yoga prop, but I recommend this for self-massage before practice. Rolling out your back, hips, and legs before yoga makes every pose more effective.
One tool I don’t recommend: those expensive yoga wheels. I’ve never seen someone use one consistently. They’re bulky, awkward to store, and don’t offer significant advantages over a bolster and blocks.
The Mistakes I See Every Single Week (And How to Fix Them)
Mistake 1: Doing Too Much, Too Soon
Marcus came to my class after watching some yoga videos online. He tried to do an hour-long intermediate practice on day one. His back seized up halfway through and he was out of commission for a week.
The fix: Start with 10-15 minutes. Do fewer poses with more attention to alignment and breath. Gradually build up over weeks and months.
Mistake 2: Ignoring Pain Signals
“No pain, no gain” doesn’t apply to yoga for. If a pose hurts, stop doing it.
The distinction to understand: There’s a difference between sensation (muscle stretch, mild discomfort) and pain (sharp, shooting, or worsening discomfort). Sensation is okay. Pain is not.
Mistake 3: Forgetting to Breathe
When poses get challenging, people hold their breath. This creates more tension and defeats the purpose of practice.
The fix: If you can’t breathe smoothly and deeply in a pose, you’re pushing too hard. Back off until you can maintain steady breathing.
Mistake 4: Practicing Inconsistently
Doing yoga for 90 minutes once a week is far less effective than 15 minutes six days a week.
The science: Your nervous system and muscle patterns change through consistent repetition. Sporadic practice doesn’t create lasting change.
Mistake 5: Comparing Yourself to Others
Jessica would get frustrated watching other students fold deeper in forward bends while she could barely touch her shins.
The truth I tell every new student: Your body is unique. Your history is unique. Your limitations and strengths are unique. The only comparison that matters is you versus you last month.
Creating Your Personal Back Pain Relief Practice
Here’s the sequence I give to new students dealing with back pain:
Daily Morning Routine (10 minutes):
- Cat-Cow: 2 minutes
- Child’s Pose: 2 minutes
- Sphinx Pose: 2 minutes
- Supine Spinal Twist: 2 minutes per side
- Final relaxation on back: 1 minute
3x Per Week Evening Practice (20 minutes):
- Cat-Cow: 2 minutes
- Downward Dog (modified): 1 minute
- Low Cobra: 5 repetitions
- Bridge Pose: 3 sets of 10 breaths
- Locust Pose: 3 sets of 5-10 breaths
- Thread the Needle: 2 minutes per side
- Supine Spinal Twist: 2 minutes per side
- Legs Up the Wall: 5 minutes
Weekend Deep Practice (30-40 minutes):
Include all the above poses plus Triangle Pose, Extended Child’s Pose with props, and longer holds in Legs Up the Wall (10-15 minutes).
When Yoga Isn’t Enough: Honest Advice
I need to be direct about something: yoga isn’t magic.
If you’ve been practicing consistently for 6-8 weeks and seeing zero improvement, something else is going on. You might need:
Physical therapy: Especially if you have structural issues, muscle imbalances, or need specific rehabilitation protocols.
Medical imaging: MRI or X-rays can reveal herniated discs, fractures, or other issues that need medical intervention.
Ergonomic changes: Your practice won’t overcome 10 hours daily in a terrible chair with a poorly positioned monitor.
Strength training: Sometimes you need to build strength before yoga will be effective. Working with a trainer for 8-12 weeks might be the foundation your practice needs.
Stress management: If stress and anxiety are major contributors to your pain, you might need counseling or therapy alongside yoga.
I’ve referred plenty of students to physical therapists, doctors, and other specialists. There’s no shame in needing additional support. Actually, it shows good judgment and self-awareness.
Frequently Asked Questions About Yoga for Back Pain
How long before I see results from yoga for back pain?
Most students notice some improvement within 2-3 weeks of consistent practice. Significant, lasting results typically emerge around the 8-12 week mark. But everyone’s different. I’ve had students feel dramatically better after one week, and others who needed three months of steady practice before major relief kicked in.
Can yoga make back pain worse?
Yes, if you’re doing the wrong poses or doing them incorrectly. Forward folds can worsen herniated disc issues. Deep backbends can aggravate facet joint problems. Twists done forcefully can strain muscles. This is why starting gently and working with a knowledgeable teacher matters so much.
Should I practice yoga during a back pain flare-up?
It depends on severity. For mild flare-ups, gentle movement often helps more than complete rest. Try cat-cow, child’s pose, and supine twists. For severe flare-ups where you can barely move, rest for 1-2 days, then start very gentle movement as soon as possible. Extended rest often makes things worse.
Is hot yoga good for back pain?
This is controversial. Some people find the heat helps their muscles relax and increases flexibility. Others find it too intense and dehydrating. My take: if you’re new to yoga or dealing with significant pain, start with room temperature classes. Once you’re stronger and more familiar with the poses, you can experiment with heated classes if you want.
What’s better for back pain: yoga or Pilates?
Both can be excellent. Yoga emphasizes flexibility, breath work, and stress reduction. Pilates focuses more on core strength and precise movement control. Many of my students do both. If you can only choose one, try both for a month and see which resonates with your body and goals.
Can I do yoga for back pain if I’m overweight?
Absolutely. I’ve worked with students of all body types and sizes. Most poses can be modified to work for any body. Use props generously, take your time, and don’t compare yourself to anyone else. Your practice is yours alone.
Should I practice yoga before or after I work out?
For back pain specifically, I recommend gentle yoga before workouts as a warm-up, and deeper stretching yoga after workouts when muscles are warm. But this varies based on your workout type and goals. Experiment and see what feels best.
How do I know if my back pain is serious and I shouldn’t do yoga?
See a doctor before starting yoga if you have: severe pain that doesn’t improve with rest, pain that radiates down your legs, numbness or tingling in your legs or feet, loss of bladder or bowel control, pain after trauma or injury, or pain accompanied by fever or unexplained weight loss.
What style of yoga is best for back pain?
Gentle Hatha yoga, Iyengar yoga (which emphasizes precise alignment), and restorative yoga are all excellent choices. Avoid hot yoga, power yoga, or Ashtanga if you’re new to practice or dealing with significant pain. These more intense styles can overwhelm your body before it’s ready.
Can yoga help with sciatica?
Sometimes, but with major caveats. Some forms of sciatica respond well to gentle yoga that stretches the piriformis muscle and improves hip mobility. Other forms (especially those caused by herniated discs) can be worsened by certain yoga poses. Work with both a healthcare provider and an experienced yoga teacher who understands sciatica.
My Final Thoughts After 10,000+ Classes
Here’s what eight years of teaching yoga for back pain has taught me:
The students who succeed share one quality: consistency. Not perfection. Not athletic ability. Not flexibility. Consistency.
The person who practices 15 minutes six days a week will get better results than someone who does 90 minutes once a week. Every single time.
The poses themselves matter less than how you do them. I’d rather see someone do three poses with excellent alignment, steady breathing, and full presence than rush through fifteen poses mindlessly.
Props aren’t cheating. They’re tools for practicing safely and effectively. I’ve been teaching for eight years and I still use props regularly in my own practice.
Your back pain probably took years to develop. Be patient with the healing process. Sustainable change takes time.
Yoga is a practice, not a performance. Nobody’s judging you. Nobody cares if you can touch your toes. The only thing that matters is showing up for yourself consistently.
One last story: remember Sarah from the beginning of this article? The one who couldn’t turn her head to check her blind spot?
I ran into her at the grocery store last month, three years after she’d completed my back pain workshop series. She’s now teaching yoga herself, specializing in students over 50 dealing with chronic pain.
“You changed my life,” she told me.
But here’s the thing I didn’t change her life. She changed her own life by showing up consistently, practicing patience with herself, and trusting the process even when progress felt slow.
The poses in this article are the same ones she practiced. The modifications and tips are what I taught her. Now they’re yours too.
What you do with them is up to you.
Start small. Start today. Your back will thank you.
Have questions about modifying these poses for your specific situation? Drop a comment below. I read and respond to every single one, usually within 24 hours. Let’s figure this out together.